Kids love to touch, build, and discover how things work. When children get their hands dirty with science experiments at home, something special happens. They start asking questions, making connections, and developing skills that will help them for years to come. STEM education does not have to happen only in fancy classrooms with expensive equipment. Your kitchen table, backyard, or living room can become the perfect laboratory for young scientists.
STEM is important in early childhood education because it encourages a love of learning and promotes analytical skills. The magic happens when children see science come alive through simple activities they can do with everyday materials. These hands-on experiments help kids understand the world around them while building confidence in their ability to solve problems and think creatively.
Parents and teachers often worry that STEM activities are too complicated or require special training. The truth is much simpler. Children naturally want to explore and experiment. When you give them safe materials and clear instructions, they become little inventors and researchers. Research has shown a link exists between science instruction and improvement in literacy, language learning, and executive functioning. This means that when kids do science experiments, they also get better at reading, speaking, and thinking clearly.
The six DIY activities we will explore today use materials you probably already have at home. Each project teaches important science concepts while keeping kids engaged and excited about learning. From understanding how water gets cleaned to building moving robots, these experiments show children that science is everywhere in their daily lives.
Why Hands-On STEM Learning Works So Well for Kids
Children learn best when they can touch, move, and interact with the world around them. This type of learning, called hands-on or experiential learning, helps kids remember information much better than just reading about it in books. When a child builds a water filter with their own hands, they understand how clean water works in a way that no textbook can teach.
STEM education encourages children to become problem solvers from an early age. When children are exposed to STEM challenges, they learn to think through problems step by step. This skill helps them in school subjects like math and reading, but it also helps them handle everyday challenges like figuring out why their bike chain fell off or how to organize their bedroom.
Young minds are naturally curious about how things work. They want to know why water flows downhill, what makes sounds travel through air, and how machines move. Hands-on STEM activities feed this curiosity in healthy ways. Instead of just watching videos or looking at pictures, kids get to be the scientists conducting real experiments. They form hypotheses about what might happen, test their ideas, and learn from both successes and mistakes.
Research shows that among preschool-aged children, knowledge of math is a better predictor of later academic achievement than early reading or attention skills. This finding surprises many parents who focus mainly on teaching their children to read. While reading remains important, early exposure to math and science concepts through hands-on activities gives children a strong foundation for all future learning. When kids measure water for an experiment or count materials for a project, they practice math skills without even realizing it.
1. Simple Water Filtration: Understanding How Clean Water Works
Clean drinking water is something most of us take for granted, but teaching kids how water filtration works helps them appreciate this precious resource. This experiment also introduces children to the engineering process of solving real-world problems through design and testing.
To create a simple water filter, you will need a clear plastic bottle, cotton balls, small rocks or gravel, sand, and dirty water made from soil and water mixed. Cut the bottom off the plastic bottle and turn it upside down so the cap end points down. Remove the cap to create an opening for filtered water to flow through. This setup creates a funnel that will hold your filtering materials.
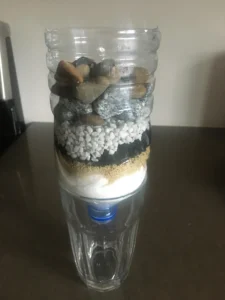
Layer the materials inside the upside-down bottle in this order: cotton balls at the bottom near the cap opening, then sand, then small rocks at the top. Each layer serves a different purpose in cleaning the water. The rocks catch large pieces of dirt and debris. The sand filters out smaller particles. The cotton balls work like a final net to catch tiny bits that made it through the other layers.
Pour your dirty water slowly into the top of the filter and watch what happens. The water that comes out of the bottom should look much cleaner than what you poured in. This demonstrates how nature cleans water as it moves through soil and rock layers underground. You can experiment with different materials, like coffee filters or cloth, to see how they change the filtering process. Kids often get excited when they see the dirty water transform into cleaner water right before their eyes. This visual result helps them understand that engineering solutions can solve real problems that affect people every day. The activity also teaches patience, as good filtration takes time and cannot be rushed.
2. Static Electricity Experiment: Exploring Invisible Forces
Static electricity surrounds us every day, but most children do not understand what creates those surprising little shocks they sometimes feel. This experiment helps kids see and control static electricity using simple materials, making an invisible force visible and fun to explore.
You will need balloons, small pieces of paper torn into tiny bits, a plastic comb, and your hair or a wool sweater. Start by rubbing a balloon on your hair for about 30 seconds. The friction between the balloon and your hair creates static electricity by moving tiny particles called electrons from your hair to the balloon. This gives the balloon a negative electrical charge while leaving your hair with a positive charge.

Hold the charged balloon near the small pieces of paper without touching them. The paper pieces will jump up and stick to the balloon like magic. This happens because the negative charge on the balloon attracts the positive charges in the paper. You can also try holding the balloon near your hair to see how individual strands reach up toward it. This same force is what makes your hair stand up sometimes when you go down a plastic playground slide.
Try the experiment with different materials to see what works best for creating static electricity. Rub the plastic comb through your hair and then hold it near the paper pieces. Test different types of fabric like wool, cotton, or synthetic materials. Some combinations create stronger static charges than others. Kids love predicting which materials will work before testing them. This teaches them to form hypotheses and test their ideas systematically.
The static electricity experiment connects to many things children experience in daily life. They start to understand why socks stick together when they come out of the dryer, why their hair gets messy on dry days, and why they sometimes get shocked when touching doorknobs. This connection between the experiment and real life helps children see that science is not just something that happens in laboratories but is part of their everyday world.
3. Sound Detector System
Sound is invisible, but kids can build a simple detector that shows how sound waves travel through air and materials. This activity combines engineering skills with physics concepts, teaching children about vibrations, amplification, and how different materials affect sound transmission.
Gather a paper cup, string or yarn, aluminum foil, and various small objects like rice, salt, or small beads. Poke a small hole in the bottom of the paper cup and thread about two feet of string through it. Tie a knot on the inside so the string cannot pull back through the hole. Stretch a piece of aluminum foil tightly over the top opening of the cup and secure it with a rubber band or tape. Sprinkle a small amount of rice or salt on top of the foil.
Hold the cup and have someone speak into the string end while you watch the foil surface. The sound waves travel through the string and make the foil vibrate, causing the rice or salt to dance and jump. Try different types of sounds – loud voices, whispers, music, or humming. Each type of sound creates different patterns of movement on the foil surface.
Experiment with different materials for the string. Try yarn, fishing line, wire, or thread to see how each one carries sound differently. Test various materials for the vibrating surface, too. Replace the aluminum foil with plastic wrap, paper, or thin fabric to observe how different materials respond to sound vibrations. Some materials will show the vibrations more clearly than others.
This experiment teaches children that sound is moving air that creates vibrations in objects. They learn that sound needs something to travel through – it cannot move through space. The visual element of seeing the rice or salt move makes the invisible concept of sound waves concrete and understandable. Kids often spend a long time testing different sounds and materials, developing their skills in systematic observation and comparison. They start to understand how telephones, radios, and musical instruments work by converting sound into other forms of energy and back again.
4. Cardboard Robotic Hand
Building a robotic hand from cardboard teaches children about both engineering design and human anatomy. This project shows kids how tendons and joints work in their own hands while challenging them to solve mechanical problems through trial and error.
You will need cardboard, straws, string or yarn, scissors, tape, and a ruler. Start by tracing your child’s hand on a piece of cardboard and cutting out the shape. This creates the palm and basic finger structure. Cut the fingers into three sections each to represent the joints in real fingers. Use tape to attach the sections with small gaps between them so the fingers can bend like real joints.
Cut pieces of straw that are slightly shorter than each finger section. Tape these straws to the back of each finger section, running from the tip down to the palm. Thread a string through each set of straws – one string per finger. Pull the strings to make the fingers curl, just like how tendons in your real hand pull to bend your fingers. Tape the ends of the strings to the wrist area of the cardboard hand.
Test your robotic hand by pulling individual strings to move each finger separately. Try to pick up light objects like paper clips, cotton balls, or small toys. Most children discover that their first design needs improvements. The fingers might not bend in the right places, or the strings might break, or the joints might be too stiff. This is perfect because problem-solving and redesigning are essential parts of the engineering process.
Work with your child to identify problems and brainstorm solutions. If the fingers are too stiff, try making the joints looser. If the strings break, try using stronger materials or pulling more gently. If the hand cannot pick up objects, experiment with adding texture to the fingertips or changing the finger shapes. Each improvement teaches children that engineering is an ongoing process of testing, learning, and improving designs.
Compare the cardboard hand to your child’s real hand. Talk about how both use similar principles but with different materials. Real hands use bones, muscles, and tendons, while the robotic hand uses cardboard, straws, and string. This comparison helps children understand that engineers often solve problems by copying designs they see in nature.
5. Water Level Detector
A water level detector teaches children about electrical circuits and sensors while solving a practical problem. This project introduces basic electronics concepts in a safe, hands-on way that kids can understand and build themselves.
Gather a clear container, water, two pieces of wire, a small battery, a small LED light or buzzer, electrical tape, and aluminum foil. Strip the plastic coating off both ends of each wire to expose the metal inside. Connect one wire to the positive end of the battery and another wire to the negative end. Connect the other ends of these wires to your LED light or buzzer, creating a simple circuit.
Create the water sensor by wrapping small pieces of aluminum foil around the exposed ends of two additional wires. These will serve as your water detection probes. Connect one probe wire to your existing circuit between the battery and the LED. Leave a gap in the circuit that will only close when water touches both aluminum foil probes.
Place the probes in your clear container at the water level where you want the detector to alert you. Pour water slowly into the container. When the water level reaches both aluminum foil probes, it completes the electrical circuit, and the LED lights up or the buzzer sounds. This happens because water can conduct electricity, allowing the electrical current to flow between the two probes.
Test your detector with different water levels and adjust the probe positions to change when the alert happens. Try adding salt to the water to see if it makes the detector more sensitive. Salt water conducts electricity better than plain water, so the LED might shine brighter or the buzzer might sound louder. This teaches children that different materials conduct electricity differently.
This project connects to many real-world applications that children can understand. Rain gauges use similar sensors to measure rainfall. Washing machines have water level detectors to know when they have enough water. Fish tanks use sensors to maintain proper water levels. By building their detector, children learn that the technology around them works on principles they can understand and even recreate themselves.
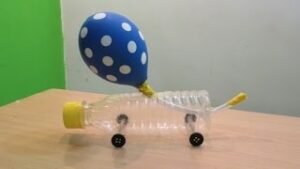
6. Moving-Car with Plastic Bottles
Building a moving car from recycled materials teaches children about forces, motion, and energy transfer while encouraging creative problem-solving. This project combines physics concepts with environmental awareness by showing kids how to repurpose materials that might otherwise become waste.
Collect plastic bottles, bottle caps, wooden skewers or long pencils, rubber bands, tape, and lightweight materials for decoration. Start with a plastic bottle that will serve as the car body. Remove the label and clean the bottle thoroughly. This becomes the main structure that will hold all the other components together.
Create the wheels by using four bottle caps of similar size. Poke holes through the center of each cap using a nail or sharp tool (adults should handle this step). The holes need to be just big enough for your wooden skewers to pass through, but small enough that the wheels will not slide around loosely on the axles.
Make two axles by threading wooden skewers through opposite holes poked in the sides of the bottle. The skewers should extend beyond both sides of the bottle so you can attach wheels to each end. Slide the bottle cap wheels onto the skewer ends and secure them with tape or by bending the skewer ends to prevent the wheels from sliding off.
Test your basic car by pushing it gently on a smooth surface. It should roll in a straight line if the wheels are aligned properly. If the car pulls to one side, check that all wheels are the same size and that the axles are straight and parallel to each other. Making these adjustments teaches children about balance, alignment, and how small details affect the performance of mechanical systems.
Add a propulsion system using rubber bands. Tie several rubber bands together to create a long chain. Attach one end to the front of the car and the other end to a fixed point like a chair leg. Pull the car backward to stretch the rubber bands, then release it to see the stored energy convert into motion. Experiment with different numbers of rubber bands, different stretch distances, and different release techniques to see how each variable affects the car’s speed and distance traveled.
Safety Tips and Getting the Most from These Activities
- Safety should always come first when children conduct science experiments. Adult supervision is important, especially when activities involve cutting materials, using small objects that could be choking hazards, or working with electrical components like batteries. Create clear rules about which tools kids can use independently and which require adult help.
- Set up experiments in appropriate spaces where spills and messes will not cause problems. Cover work surfaces with newspapers or old towels. Have cleaning supplies ready before starting any project. Teaching children to clean up as they work instills good habits and prevents accidents from scattered materials.
- Encourage children to ask questions throughout each activity. When they wonder why something happens or want to try a different approach, support their curiosity with additional experiments or research. The goal is not just to complete the projects but to foster a questioning mindset that will serve them well in all areas of learning.
- Keep detailed records of each experiment by taking photos, drawing pictures, or writing simple observations. This documentation helps children remember what they learned and provides material for discussions later. They can compare results from different attempts and track their progress as they improve their designs and techniques.
- Connect these activities to other subjects children are studying. The water filtration experiment links to geography lessons about water resources. The sound detector connects to music and physics. The robotic hand relates to biology and anatomy studies. Making these connections helps children see that knowledge from different subjects works together to solve real problems.
Remember that mistakes and failures are valuable parts of the learning process. When an experiment does not work as expected, help children analyze what went wrong and brainstorm improvements. This teaches resilience and critical thinking skills that extend far beyond science class. The most important outcome is not perfect results but engaged, curious children who feel confident in their ability to explore and understand the world around them.
These six DIY STEM activities provide hours of educational fun while building foundation skills in science, technology, engineering, and mathematics. They prove that effective STEM education does not require expensive equipment or complex procedures – just curiosity, creativity, and everyday materials transformed into tools for discovery.